Setting up an Apache Zookeeper cluster in Docker
I recently set up an Apache Zookeeper cluster with three nodes in Docker on my MacBook to simulate what needs to be done in an actual setup in a full production setup. There are probably many articles that have been written on this topic, that have applied various other approaches. Regardless, here’s how I did it.
Before we begin…
- What is Zookeeper? That’s too much to cover here, and others can explain it, and have done so, much better than I. Please visit the Apache Zookeeper Overview to find out more.
- You’ll need a container runtime engine running on your development machine. I use Docker Desktop on my Mac. The steps here can be adapted for Docker Desktop for Windows, Docker for Linux or other container runtime engines.
- You‘ll need to be signed in to Dockerhub or any image repository that has the version of Zookeeper that you need. I am using the
zookeeper:3.6.1image but you may adapt the steps here for other releases, or images from other publishers, such asbitnami/zookeeperorconfluent/cp-zookeeper. - If you’re using a Mac, in place of
wget, you may need to usecurl -O, or installwgetby runningbrew install wgeton the Terminal. - If you’re on Windows, in place of
wgetandtar, you may just download the files with your browser and use 7-zip to uncompress.tar.gzfiles. Alternatively, you can install and usecurlorwgetfor Windows.
Let’s get started.
1. Get the Zookeeper files and image
Download and uncompress a stable release of Apache Zookeeper. At the time of writing, this is 3.6.1. For the current task, we will only use this for the Zookeeper CLI. At a later stage, it can be used to build a custom image.
The following commands will install Zookeeper in the folder /path/to/zookeeper/apache-zookeeper-3.6.1-bin.
$ cd /path/to/zookeeper$ wget https://apachemirror.sg.wuchna.com/zookeeper/zookeeper-3.6.1/apache-zookeeper-3.6.1-bin.tar.gz$ tar -zxvf apache-zookeeper-3.6.1-bin.tar.gz
Next, pull a stable release (preferably the same version as the one downloaded above) of Apache Zookeeper from docker.
$ docker pull zookeeper:3.6.12. Prepare the environment variables to be used in the containers
For the zookeeper:3.6.1 image, a list of the configurable environment variables is provided in the description on Dockerhub. If you prefer to deep-dive into what goes on within the container at startup, I recommend looking at its associated docker-entrypoint.sh (Spoiler: It creates new configuration files using the environment variables you provide or default values).
The following is what I used for my first node. I saved this file as zookeeper1.env.
# Contents of zookeeper1.env
ZOO_TICK_TIME=2000
ZOO_INIT_LIMIT=5
ZOO_SYNC_LIMIT=2
ZOO_MY_ID=1
ZOO_STANDALONE_ENABLED=true
ZOO_ADMINSERVER_ENABLED=true
ZOO_SERVERS=server.1=zookeeper1:2888:3888;2181 server.2=zookeeper2:2888:3888;2181 server.3=zookeeper3:2888:3888;2181
Note that for theZOO_SERVERS variable, the entries server.1=zookeeper1:2888:3888;2181 server.2=zookeeper2:2888:3888;2181 server.3=zookeeper3:2888:3888;2181 are all in one line, with no spaces within each entry and a space separating each entry. There is no need to escape the equals symbol here.
In case you’re wondering what these numbers are, they are some of the ports used by Zookeeper for communication within the cluster and connections from external sources:
- 2888: Quorum port used by the leader node to communicate with follower nodes
- 3888: Leader election port used to vote a leader
- 2181: Client connection port
- 8080: Admin server port
For the second and third nodes (Zookeeper requires an odd number of nodes), set ZOO_MY_ID=2 and ZOO_MY_ID=3 respectively, and save them in different files.
3. Prepare volumes to mount on your containers
Rather than have fully ephemeral containers or volumes created, mounted, and bound on-the-fly, I prefer to have data persisted into local volumes created in advance, to simulate what goes on in a Production environment. I created data, datalog, and log volumes for each Zookeeper node.
The following are the commands I used for the first node.
$ docker volume create --driver local \
--opt type=none \
--opt device=/Volumes/data/zookeeper1 \
--opt o=bind \
--name zookeeper1-dataDir$ docker volume create --driver local \
--opt type=none \
--opt device=/Volumes/data/zookeeper1_datalog \
--opt o=bind \
--name zookeeper1-dataLogDir$ docker volume create --driver local \
--opt type=none \
--opt device=/Volumes/logs/zookeeper1 \
--opt o=bind \
--name zookeeper1-logs...$ docker volume ls | grep zookeeper
local               zookeeper1-dataDir
local               zookeeper1-dataLogDir
local               zookeeper1-logs
local               zookeeper2-dataDir
local               zookeeper2-dataLogDir
local               zookeeper2-logs
local               zookeeper3-dataDir
local               zookeeper3-dataLogDir
local               zookeeper3-logs
Note that on Mac and Windows, Docker is meant to be used for development, so there are limited driver types that can be used. Also, for the locations that can contain shared volumes that can be mounted on containers in Windows and Mac OS X, you can configure them in [Docker Desktop] → [Preferences] → [Resources] → [File Sharing].
4. Enable communication among the nodes
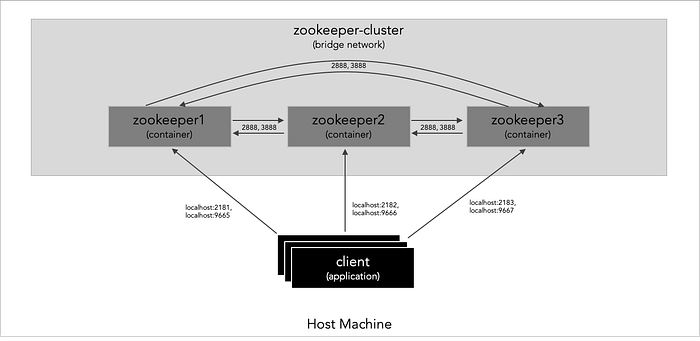
I wanted to simulate different machines using the same ports for the quorum and leader election ports (2888 and 3888), client connections (2181), and admin server (8080). That would be tricky if there wasn’t some sort of network isolation.
For this, I set up a bridge network in Docker:
$ docker network create --driver bridge zookeeper-cluster$ docker network ls | grep zookeeper
7c8c425b440f      zookeeper-cluster   bridge        local
In the next step, I map different ports 2181–2183 to the client connection port (2181) and 9665–9667 (which equals ZOOK to ZOOK+2) to the admin server port (8080) on each node to be able to access them directly. Ports 2888 and 3888 are not considered for routing on the host machine as they are only used for intra-cluster communications. The idea is to establish the following connectivity:
5. Start the containers for the nodes!
Now we put everything together by:
- injecting different sets of environment variables into copies of a docker image,
- mounting volumes on them,
- giving them each a name,
- joining them on a bridge network,
- then connect to them using the CLI.
First, I start up only one node, then try to connect to it using the Zookeeper CLI and get a Connection refused error as shown below:
$ docker run -d \
--rm=true \
--publish 2181:2181 \
--publish 9665:8080 \
--env-file zookeeper1.env \
--mount source=zookeeper1-dataDir,target=/data \
--mount source=zookeeper1-dataLogDir,target=/datalog \
--mount source=zookeeper1-logs,target=/logs \
--name zookeeper1 \
--network zookeeper-cluster \
zookeeper:latest$ /path/to/zookeeper/apache-zookeeper-3.6.1-bin/bin/zkCli.sh -server localhost:2181

Then I start up a second node and try to connect to the first node again, with success this time:
$ docker run -d \
--rm=true \
--publish 2182:2181 \
--publish 9666:8080 \
--env-file zookeeper2.env \
--mount source=zookeeper2-dataDir,target=/data \
--mount source=zookeeper2-dataLogDir,target=/datalog \
--mount source=zookeeper2-logs,target=/logs \
--name zookeeper2 \
--network zookeeper-cluster \
zookeeper:latest$ /path/to/zookeeper/apache-zookeeper-3.6.1-bin/bin/zkCli.sh -server localhost:2181

As we already know, Zookeeper needs an odd number of nodes, so I start up the third node, and use the CLI to connect to them, with results similar to the above:
$ docker run -d \
--rm=true \
--publish 2183:2181 \
--publish 9667:8080 \
--env-file zookeeper3.env \
--mount source=zookeeper3-dataDir,target=/data \
--mount source=zookeeper3-dataLogDir,target=/datalog \
--mount source=zookeeper3-logs,target=/logs \
--name zookeeper3 \
--network zookeeper-cluster \
zookeeper:latest$ /path/to/zookeeper/apache-zookeeper-3.6.1-bin/bin/zkCli.sh -server localhost:2182$ /path/to/zookeeper/apache-zookeeper-3.6.1-bin/bin/zkCli.sh -server localhost:2183
6. Explore Zookeeper
Now that we have a Zookeeper cluster set up, we can explore it further. The easiest place to start is the admin server, accessible via the browser or by using curl.
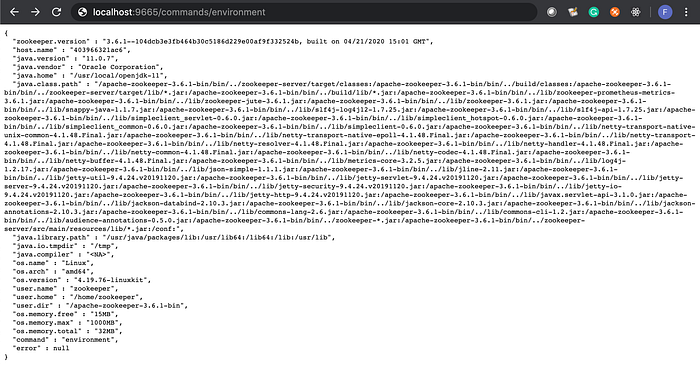
$ curl http://localhost:9665/commands/leader
{
"is_leader" : false,
"leader_id" : 2,
"leader_ip" : "zookeeper2",
"command" : "leader",
"error" : null
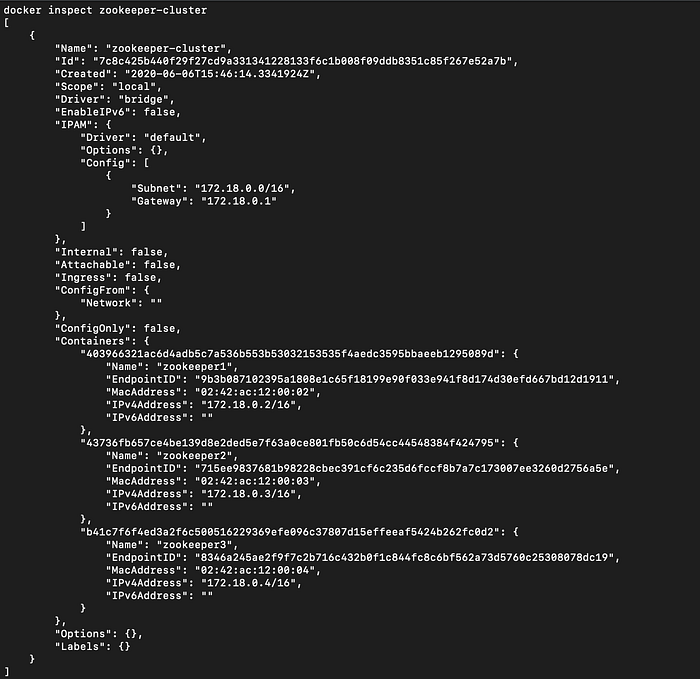
}One could also inspect the docker objects that are part of this implementation by using docker inspect <object-name>. For example, docker inspect zookeeper-cluster yields the following:
Yet another way to explore is to connect other applications to the cluster. The Apache Zookeeper team maintains a list here. Many of the software there comes bundled with Zookeeper (especially the Apache projects), but it’s good to see how they connect and what a common Zookeeper cluster can do.
What’s next for me?
What I’m going to do next is to enhance the implementation to add security: in-transit, authentication, and authorisation. Some of these are configurable by environment variables and by mounting volumes, but the base Zookeeper image from Dockerhub doesn’t take in these variables or have these destinations. That would mean building a new image to enable that, making use of the existing image and/or the release that I downloaded, and possibly creating some new JARs.